

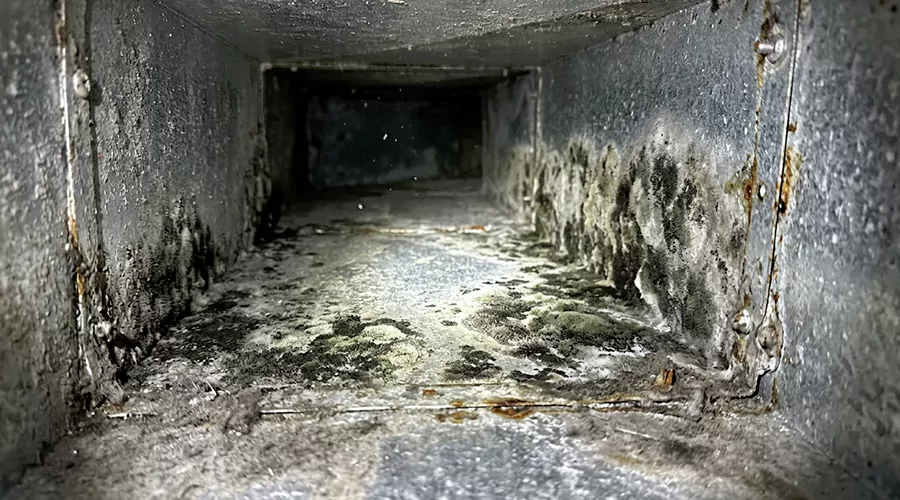
You can check for mold on HVAC vents by examining visible deposits and looking for moisture around the openings. A flashlight and digital hygrometer can help you complete a basic inspection in approximately 10 to 15 minutes. However, dark stains or musty odors alone cannot confirm mold because ordinary dust and other particles may look similar.
HVAC vents collect airborne particles during normal heating and cooling operation. Return grilles may develop visible dust across their openings, while supply vents sometimes show dark staining around the edges. These deposits are common and do not automatically indicate fungal growth.
Mold becomes a greater concern when the surface remains damp or shows signs of water damage. Identifying moisture is therefore an important part of checking suspicious deposits. A careful visual inspection can help determine whether the problem is limited to an exterior grille or may involve surrounding building materials.
What Does Mold Look Like on HVAC Vents?
Mold on HVAC vents may appear as irregular discolored patches or surface growth that differs from ordinary dust deposits. However, color and texture alone cannot reliably identify fungal contamination. The presence of moisture and the condition of surrounding surfaces provide more useful clues during a visual inspection.
Black or Dark Green Patches
Mold can develop in several colors depending on the organism and the affected material. Some growth appears dark, while other contamination may have lighter coloring. A black deposit should not automatically be described as toxic mold because appearance cannot identify the species.
Airborne soot and household dust can produce similar dark deposits. This is particularly common around supply grilles where airflow carries particles across nearby ceilings. The shape of the staining and the presence of moisture should be considered together.
Irregular Surface Growth
Some fungal growth develops as uneven patches rather than a uniform layer of dust. The surface may appear textured or discolored, especially when growth occurs on damp paint or nearby building materials.
However, dust can also collect unevenly around grille openings. An irregular deposit is a reason to investigate rather than proof that mold is present. Physical appearance alone cannot determine the material's composition.
Moisture Around the Vent
Repeated moisture is a significant warning sign because mold needs water to grow. Cold supply grilles may develop condensation when humid indoor air contacts their surfaces. Water can also reach vent openings through roof or plumbing leaks.
If a grille repeatedly becomes damp during cooling, the cause should be investigated even when visible growth has not developed. Moisture can affect surrounding drywall and concealed insulation before the full extent of damage becomes visible.
Musty Odors During HVAC Operation
A musty odor may indicate that moisture is present somewhere in the building or HVAC system. The smell may become noticeable when the blower operates because moving air carries odors through occupied rooms.
However, an odor does not identify the exact location of mold. Damp carpets and other building materials can produce similar smells. Checking nearby moisture conditions is more useful than assuming that the vents are the source.
How Can You Tell Mold From Dust on HVAC Vents?
Mold and dust can appear similar when they accumulate around HVAC openings. Dust often forms a dry coating along the grille, while suspected mold becomes more concerning when it appears on persistently damp material. These differences help guide inspection but do not confirm the identity of a deposit.
Airflow patterns can make ordinary dust form dark streaks around ceiling vents. Condensation may also cause particles to stick to cold metal and nearby paint. The resulting marks can resemble mold even when fungal growth has not been established.
| Observation | Possible Explanation | What to Check |
|---|---|---|
| Dry gray coating across grille | Ordinary household dust | Return airflow and housekeeping conditions |
| Dark streaks following vent edges | Particle deposits along airflow paths | Nearby ceiling surfaces |
| Irregular patches on damp paint | Possible fungal growth | Moisture and water damage |
| Water droplets on metal grille | Condensation | Indoor humidity and surface temperature |
| Brown or yellow ceiling stains | Water intrusion | Roof or plumbing leaks |
| Musty smell without visible growth | Hidden damp material | Moisture sources near the system |
| Deposits inside accessible duct | Dust or possible contamination | Duct condition and moisture history |
The table helps identify possible causes rather than provide a final diagnosis. A dark deposit can be ordinary dust even when it appears unusual. Likewise, contamination may exist in concealed materials without being visible on the grille.
How to Check for Mold on HVAC Vents Step by Step?
A basic HVAC vent inspection should begin with accessible surfaces and visible moisture conditions. The goal is to gather observations without disturbing suspected contamination. You do not need to dismantle the duct system or take household mold samples during the initial check.
Step 1. Turn Off the HVAC System
Switch off the heating or cooling system at the thermostat and wait until airflow stops. This allows you to examine the vent without moving air disturbing loose deposits. It also makes the inspection more controlled when a grille is located near furniture or other household surfaces.
If the HVAC system is known or credibly suspected to contain mold, keep it off until the condition has been assessed. Running a contaminated system may distribute particles through the building. An exterior stain alone does not automatically establish that internal contamination exists.
Step 2. Inspect the Vent Cover
Examine the visible grille and look for unusual deposits around the openings. Notice whether the material forms a uniform coating or appears as irregular patches on surrounding surfaces. A flashlight can help reveal discoloration that is difficult to see under normal room lighting.
Do not touch or scrape suspected growth to determine its texture. Disturbing material can release particles into the air and may damage painted surfaces. Photograph the deposit so you can compare its condition later.
Step 3. Check the Surrounding Ceiling or Wall
Look beyond the grille for water stains or damaged paint. Condensation may collect along the outer edges of a cold supply vent and affect the surrounding drywall. Water entering from a roof leak can also create stains near an opening.
Pay attention to peeling paint and soft drywall because these conditions may indicate repeated moisture exposure. A stain extending away from the vent may involve building materials rather than contamination originating inside the duct.
Step 4. Measure Indoor Humidity
Use a digital hygrometer to record the room's relative humidity. A general indoor target of approximately 30% to 50% is useful for reducing conditions that support mold growth. Readings that remain elevated increase concern when cold surfaces are already showing condensation.
Take measurements during normal household conditions rather than relying on a single reading immediately after a shower. Humidity changes throughout the day and may vary between rooms. Repeated observations provide a better picture of the moisture environment.
Step 5. Check for Condensation
Look for water droplets on the grille or nearby surfaces. If the vent is dry during the initial inspection, review whether moisture has appeared during previous cooling cycles. Record when condensation occurs and whether it disappears after the system stops.
A vent that repeatedly becomes wet should be investigated because the same conditions may affect nearby insulation or building materials. Drying visible water removes the immediate moisture but does not explain why condensation developed.
Step 6. Inspect Other Accessible Vents
Compare the suspicious opening with similar vents in nearby rooms. Determine whether dark staining is limited to one grille or appears throughout the home. A localized moisture problem may affect a single ceiling opening while other vents remain dry.
Differences between rooms can help identify possible causes. However, contamination at one vent does not automatically prove that the entire HVAC system contains mold. The extent of the problem should be established through actual evidence.
Step 7. Check Safely Accessible Drainage Areas
If the condensate drainage area can be observed without opening equipment panels, look for signs of standing water or overflow. Our air handler unit cleaning service addresses this component during routine maintenance. The cooling system should remove collected moisture through its designated drain. Water remaining outside the intended drainage path can affect nearby materials.
Do not open electrical compartments or reach into the air handler during this inspection. A homeowner's visual check should remain limited to accessible areas. Internal equipment requires a separate assessment when contamination or drainage problems are suspected.
Step 8. Record the Findings
Photograph the affected surfaces and document any recurring moisture conditions. Record the date and whether the problem appears during cooling or heating operation. These details make it easier to determine whether the staining changes over time.
Avoid repeatedly cleaning suspicious deposits before documenting them. Surface cleaning can remove useful evidence without correcting the underlying problem. If the material returns, the moisture source should be investigated rather than relying on appearance alone.
What Warning Signs Suggest a More Serious Mold Problem?
Suspected mold becomes more concerning when visible deposits occur alongside repeated moisture exposure or damaged building materials. These conditions may indicate contamination extending beyond the vent cover. Identifying several warning signs together provides a better basis for deciding whether deeper investigation is necessary.
Watch for these 10 signs:
- Irregular discolored patches appear on persistently damp surfaces.
- Water droplets repeatedly form around supply grille edges.
- A musty odor occurs consistently during HVAC operation.
- Dark material returns after the surrounding area has been cleaned.
- Paint begins peeling or bubbling around a vent opening.
- Drywall develops water stains or visible swelling.
- A recent roof or plumbing leak affected an area containing ductwork.
- Insulation around accessible ducts appears damp.
- Visible deposits extend beyond the exterior grille.
- Similar moisture-related problems appear on connected HVAC components.
These warning signs do not all prove fungal growth. For example, condensation can damage paint before mold appears, while dark dust may collect around a dry grille. However, recurring moisture is sufficient reason to investigate the affected area.
The condition of nearby materials is especially important. A washable metal grille and water-damaged drywall require different responses. Porous material can retain moisture beneath the visible surface and may need more extensive attention.
Can You Check for Mold Without Removing the Vent Cover?
Many useful observations can be made without removing an HVAC vent cover. Surface discoloration and condensation are often visible from the room. This approach is appropriate when the grille is difficult to access or when removing it could damage nearby paint.
Begin by photographing the exterior and checking surrounding surfaces for water stains. A flashlight can help reveal deposits between grille openings without requiring removal. A hygrometer can also identify excessive indoor humidity that may contribute to condensation.
However, an exterior inspection cannot establish the condition of concealed ductwork. Significant contamination may exist beyond the visible opening, while dark staining on the cover may have a harmless explanation. The inspection should therefore be treated as an initial screening rather than proof that mold is present or absent.
Do not force cleaning tools through the grille in an attempt to reach deeper surfaces. Flexible duct liners and internal insulation can be damaged by aggressive contact. If the opening contains substantial suspected contamination, further investigation should avoid disturbing the material.
Should You Use a Home Mold Test Kit on HVAC Vents?
Home mold test kits may collect samples from air or surfaces, but their results have important limitations. Mold spores naturally exist in indoor air and household dust. Finding spores does not automatically establish that an HVAC vent contains active fungal growth.
The CDC does not recommend routine household mold testing because there are no established health-based standards for acceptable airborne mold concentrations. Short-term sampling also may not represent normal exposure conditions. A negative result cannot reliably rule out hidden moisture damage.
A positive home test may identify mold without determining where growth is occurring. For example, an air sample may collect spores that entered from outdoors rather than material originating in the ducts. The result may therefore create uncertainty instead of resolving the actual question.
Visual inspection and moisture investigation are generally more useful starting points. If the material's identity remains uncertain and the result would change the necessary response, an appropriate expert assessment may include laboratory confirmation.
How Can You Check Whether Mold Is Inside the Ductwork?
An exterior grille inspection cannot reveal every section of the connected duct. Mold can develop in concealed areas when moisture reaches internal insulation or HVAC components. However, a suspicious stain around the opening does not automatically establish that contamination exists deeper inside the system.
The first step is determining whether the moisture problem involves the grille or surrounding building materials. Condensation may remain limited to the exterior surface, while a roof leak can affect concealed insulation. The location of water damage helps determine which areas deserve closer investigation.
Some ducts are made from bare metal and others contain internal fiberglass insulation. These materials respond differently to moisture exposure and require different cleaning methods. A dark coating on metal may be easier to assess than suspected contamination within porous insulation.
A proper inspection of concealed components should identify the actual affected material. It should also examine whether cooling drainage or duct connections are contributing to moisture. The goal is to establish the extent of the problem without unnecessarily disturbing unaffected sections.
How Can You Tell if the Staining Is Getting Worse?
Tracking changes over time can help determine whether a vent has an ongoing moisture problem. A single photograph provides limited information, while repeated observations show whether staining spreads or returns. However, known or suspected internal HVAC mold should not be monitored by continuing normal system operation.
Photograph the affected area and record whether it appears damp or dry. If the concern involves only an exterior deposit with no evidence of internal contamination, you can compare the surface after an appropriate observation period. Note any new water stains or deterioration of nearby paint.
| Observation Over Time | Possible Meaning | Recommended Action |
|---|---|---|
| Dry dust remains unchanged | Normal surface accumulation | Routine household cleaning |
| Dark streaks slowly develop without moisture | Airborne particle deposits | Check indoor particle sources |
| Condensation repeatedly returns | Persistent moisture condition | Investigate humidity and insulation |
| Staining spreads across damp drywall | Possible continuing water damage | Identify the water source |
| Growth returns after cleaning | Moisture or contamination may remain | Evaluate the affected material |
| Musty odor persists with visible moisture | Possible hidden dampness | Investigate concealed areas |
The most meaningful changes involve moisture and material deterioration rather than color alone. A growing water stain may indicate a leak even when fungal growth has not been confirmed. Taking action at the moisture stage can reduce the likelihood of further damage.
How Much Does HVAC Mold Inspection Cost in 2026?
The cost of investigating suspected mold depends on whether the work involves a basic HVAC inspection or a more detailed mold assessment. Surface staining may require only moisture checks, while suspected concealed contamination can involve additional inspection. The affected location and scope determine the expense.
Published 2026 U.S. estimates provide the following broad cost benchmarks.
| Inspection or Remediation Scope | Estimated 2026 Cost |
|---|---|
| Initial household visual inspection | No direct cost when using existing tools |
| Mold sampling or testing | Approximately $250 to $350 in some projects |
| Standard air duct cleaning when justified | $271 to $509 |
| Confirmed mold remediation in ducts | $600 to $2,000 |
| Extensive HVAC mold remediation | $3,000 to $10,000 |
These figures represent different services and should not be added together automatically. A basic visual inspection does not necessarily require laboratory testing. Mold remediation is also a separate activity from identifying whether suspicious deposits contain fungal growth.
The most appropriate scope depends on actual findings. Paying for extensive treatment before confirming the affected material can result in unnecessary work. Similarly, repeatedly cleaning a stain without investigating moisture may leave the original problem unresolved.
When Should You Call an HVAC or Mold Inspection Professional?
Professional assessment is appropriate when substantial suspected mold appears inside an HVAC system or when contamination involves moisture-damaged insulation. Persistent water intrusion and unexplained musty odors also warrant further evaluation when the source cannot be identified. The purpose is to determine whether actual growth exists and which materials are affected.
A qualified HVAC technician can inspect condensate drainage and examine accessible duct connections for conditions that contribute to condensation. When mold identification or remediation is uncertain, an experienced mold assessor may evaluate the affected materials. Laboratory testing can be considered when the findings would change the recommended action.
An inspection should identify the location of suspected contamination and the moisture source rather than rely solely on a positive air test. If significant growth is confirmed inside bare metal ducts, cleaning may be appropriate. Wet or moldy internal fiberglass insulation generally requires replacement because ordinary cleaning cannot restore the material effectively.
Request documentation of the affected components and the reason for any recommended remediation. A dark stain around one exterior grille does not automatically justify treating every duct in the home.
How Can You Prevent Mold From Developing on HVAC Vents?
Preventing mold around HVAC vents depends on keeping surfaces dry and controlling moisture near the openings. Proper humidity management reduces condensation on cold supply grilles. Maintaining duct insulation and cooling drainage also helps prevent moisture from reaching concealed materials.
Monitor Indoor Humidity
Use a digital hygrometer to check relative humidity during periods of frequent cooling. Aim for approximately 30% to 50% when practical and pay attention to readings that remain elevated. Reducing excess moisture helps limit condensation on cold grille surfaces.
Keep Vent Covers Clean and Dry
Remove ordinary dust from accessible grilles during routine household cleaning. Use a soft vacuum attachment and a slightly damp cloth when suitable for the cover material. Dry washable covers completely before reinstalling them so moisture does not remain trapped around the openings.
Maintain Condensate Drainage
Inspect safely accessible cooling equipment for signs of standing water or overflow during normal maintenance. Condensate should drain away from the air handler as intended. Repeated drainage problems can affect nearby insulation and should be corrected promptly.
Protect Duct Insulation
Check accessible ductwork for damaged insulation or disconnected joints. Poorly insulated cold duct surfaces can develop condensation when exposed to humid air. Correcting damaged connections helps reduce unwanted moisture around the system.
Respond Quickly to Water Damage
Investigate roof and plumbing leaks when stains appear near HVAC openings. Dry affected materials promptly because mold growth can begin within 24 to 48 hours under suitable conditions. Porous materials that remain wet or become contaminated may need additional assessment.
Conclusion
Checking for mold on HVAC vents begins with examining visible deposits and identifying moisture around the openings. Dark staining alone cannot confirm fungal growth because ordinary dust may look similar. Persistent condensation or damaged building materials deserve closer investigation. When contamination extends into the system, professional assessment may be necessary. This week, inspect your vents and record any recurring moisture or unusual staining.